Summary:
In this tutorial, we will see how to manage on (or more) Boinc clients located on other computers on the same network
For this, we have 2 computers:
-1 with Boinc client/Manager with the IP 192.168.1.2 (Linux/Windows/Mac)
-1 with Boinc client (headless server) with the IP 192.168.1.4 (linux)
On the headless server:
We will connect to our server using SSH and once we are logged IN, we will follow with the installation of Boinc client (not Boinc manager).
Sudo apt install boincNow that it is installed, we want to go to the folder where we will have a to edit a specific file:
cd /etc/boinc-clientAnd we edit this file:
sudo nano remote_hosts.cfg
On this file, we need to add the IPs of the computers from where the Manager witll control them. So in our case, we want the one with IP 4 to be controlled by the one with IP 2. So we add:
192.168.1.2

                  # This file contains a list of hostnames or IP addresses (one per line)

                  # of remote hosts, that are allowed to connect and to control the local

                  # BOINC core client via GUI RPCs.

                  # Lines beginning with a # or a ; are treated like comments and will be

                  # ignored.

                  #

                  #host.example.com

                  #192.168.0.180

                  192.168.1.2
Once we have added the IP, we need to restart Boinc-client:
sudo /etc/init.d/boinc-client restart
And to confirm that it runs smoothly again:
sudo nano /etc/init.d/boinc-client status
Which will open the file
                username@server:~$ /etc/init.d/boinc-client status

                ● boinc-client.service - Berkeley Open Infrastructure Network Computing Client

               Loaded: loaded (/lib/systemd/system/boinc-client.service; disabled; vendor preset: enabled)

               Active: active (running) since Fri 2022-09-02 10:23:56 UTC; 1h 26min ago

                 Docs: man:boinc(1)

             Main PID: 1660 (boinc)

                Tasks: 10 (limit: 6869)

               Memory: 2.6G

                  CPU: 5h 33min 4.598s

               CGroup: /system.slice/boinc-client.service

                       ├─1660 /usr/bin/boinc

                       ├─2157 ../../projects/einstein.phys.uwm.edu/hsgamma_FGRP5_1.08_x86_64-pc-linux-gnu__FGRPSSE --inputfile LA…

                       ├─2159 ../../projects/einstein.phys.uwm.edu/hsgamma_FGRP5_1.08_x86_64-pc-linux-gnu__FGRPSSE --inputfile LA…

                       ├─2161 ../../projects/einstein.phys.uwm.edu/hsgamma_FGRP5_1.08_x86_64-pc-linux-gnu__FGRPSSE --inputfile LA…

                       └─2324 ../../projects/einstein.phys.uwm.edu/hsgamma_FGRP5_1.08_x86_64-pc-linux-gnu__FGRPSSE --inputfile LA…
To start Boinc:
sudo /etc/init.d/boinc-client start
To stop Boinc:
sudo /etc/init.d/boinc-client stop
On the main computer:
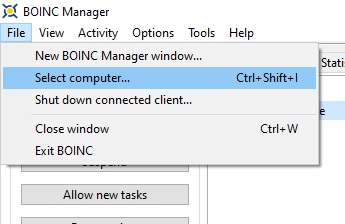
- we open Boinc Manager
- We clic on the menu "File"
- Option "Select computer" (ctrl-Mayus-I)
On the pop-up that appears, we have to specify the IP address of the remote host: 192.168.1.4
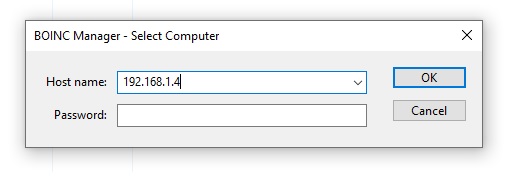
After connection is complete, we can manage it like always, adding projects, restricting computer power/disk
usage etc.
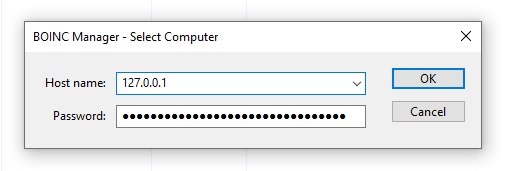
To go back to our main computer we have to select back our main computer:
- We clic on the menu "File"
- Option "Select computer" (ctrl-Mayus-I)
- On the pop-up that appears, we have to specify the IP address of the local host (password fills
automatically
not sure why 🤔): 127.0.0.1